This guide will show you, how to use WinSetupFromUSB to create a bootable USB Flash Drive including all Windows source files, plus the following installation of Windows XP. Compare to the different USB_Multiboot versions, WinSetupFromUSB comes with a Graphical User Interface (GUI) and is in my opinion easier to use.
Here you can get the latest version of the program and you will also find many detailed informations about WinSetupFromUSB.
I’ve tested this guide with a 32-bit version of Windows XP and a 64-bit version of Windows Vista and it worked flawlessly.
Prerequisites:
All you need is:
- a USB Flash Drive with at least 1GB of storage
- the original Windows XP Setup CD
- WinSetupFromUSB
If you use nLite to slim down your version of Windows XP, please keep the following in mind:
DO NOT remove “Manual Install and Upgrade”
under Operating System Options!
I also recommend to
integrate Service Pack 3 into your Windows XP source files.
1. Preparations
Download and install WinSetupFromUSB. Default installation path isC:\WinSetupFromUSB.
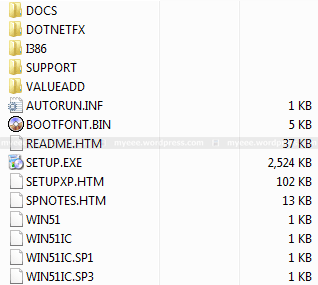
Create a new folder with the name WINXPCD in the root directory of drive C:\and copy all files from your Windows XP Setup CD into this folder. Depending on your version of Windows XP, the content of C:\WINXPCD should look approximately like this:
The following files will show you, which Service Pack is already integrated into your CD:
- WIN51IC.SP1, Sevice Pack 1
- WIN51IC.SP2, Sevice Pack 2
- WIN51IC.SP3, Sevice Pack 3
2. Start WinSetupFromUSB
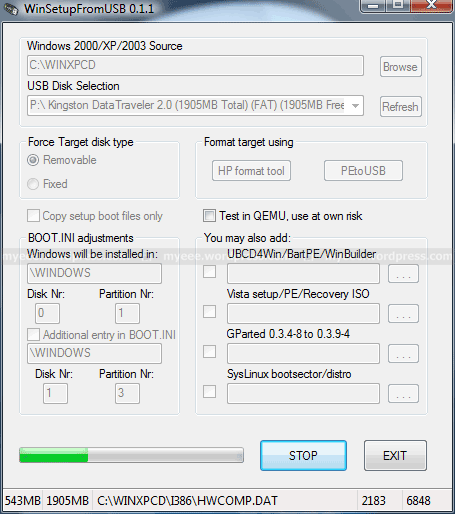
Connect the USB Flash Drive to your PC and start WinSetupFromUSB. It should show up under USB Disk Selection :
3. Select your Source Path
Click on Browse under Windows 2000/XP/2003 Source and navigate to the folder with your Windows XP Source Files. It should be C:\WINXPCD:
Click OK and C:\WINXPCD should show up under Windows 2000/XP/2003 Source :
4. Format USB Flash Drive
PeToUSB or HP Format Tool are used to format the USB Flash Drive. There is no need to download these programs seperately as they are already included in WinSetupFromUSB.
USB Flash Drives up to 2GB should be formatted with PeToUSB in FAT16, USB Flash Drives with 4GB or more with HP Format Tool in FAT32.
I will use PeToUSB to format my Kingston Data Traveler with 2GB.
In the main window of WinSetupFromUSB click PeToUSB under Format target using to start the program. The USB Flash Drive should show up underDestination Drive. Check USB Removable, Enable Disk Format and Quick Format. Uncheck Enable File Copy under File Copy Options :
Click Start and answer the following two questions “Continue?” with Yes.
All existing volumes and data will be lost!
If everything goes well, the message “Operation Completed Successfully!” should appear. Click OK and close PeToUSB.
The process with HP Format Tool is similar.
5. Copy Windows XP Source Files
To start the process of copying the Windows XP source files to the USB Flash Drive, click GO in the main window of WinSetupFromUSB. Depending on the write speed of your USB Flash drive it may take a while to copy all files.
At the end the following notice about the Windows installation process should be displayed:
Click OK and close WinSetupFromUSB with EXIT.
6. Windows Installation – Part 1
Connect the USB Flash Drive to your PC and turn on the computer. Press ESCat the boot screen and you will be able to select the USB Flash Drive as your boot device from the boot menu.
The ESC key is used by ASUS for the Eee PC series.
Other manufacturers may use other keys, e.g. F8 or F12.
After booting from USB Flash Drive, the following menu should be displayed:
- Windows XP/2000/2003 Setup – First and Second parts
Press Enter or wait 10 seconds to get to the next menu:
- First part of Windows XP Home Edition setup
- Second part of XP Home Edition setup+Start Windows for first time
First part of Windows XP Home Edition setup is already selected. Press Enteror wait 10 seconds to start the Text mode part of setup. During this part you can create, delete and format partitions and finally the setup files are copied to your hard disk. At the end the system will restart automatically.
7. Windows Installation – Part 2
After restart, boot the PC again from your USB Flash Drive. The same menu should be displayed:
- Windows XP/2000/2003 Setup – First and Second parts
Press Enter or wait 10 seconds to get to the next menu:
- First part of Windows XP Home Edition setup
- Second part of XP Home Edition setup+Start Windows for first time
Second part of XP Home Edition setup+Start Windows for first time is already selected. Press Enter or wait 10 seconds to start the GUI mode part of setup. During this part you will be asked for your product key, timezone, usernames and other necessary informations. At the end the system will restart automatically.
8. Windows Installation – Part 3
After restart, boot the PC again from your USB Flash Drive. The same menu should be displayed:
- Windows XP/2000/2003 Setup – First and Second parts
Press Enter or wait 10 seconds to get to the next menu:
- First part of Windows XP Home Edition setup
- Second part of XP Home Edition setup+Start Windows for first time
Second part of XP Home Edition setup+Start Windows for first time is already selected. Press Enter or wait 10 seconds to Start Windows for the first time. The Windows installation process will be finished and finally the Windows Desktop will appear.
DO NOT disconnect the USB Flash Drive too early!
At next startup you can boot into Windows from your hard disk.
Notes:
After successsful installation, the following boot menu will always be displayed during startup:
Please select the operating system to start:
- Microsoft Windows XP Home Edition
- USB Repair NOT to Start Microsoft Windows XP Home Edition
If you don’t plan to use the repair option and want to boot directly into windows, you have to do the following:
Open the file boot.ini in the root directory of drive C:\ with Notepad:
[Boot Loader]timeout=30
Default=multi(0)disk(0)rdisk(0)partition(1)WINDOWS
[Operating Systems]
multi(0)disk(0)rdisk(0)partition(1)WINDOWS=”Microsoft Windows XP Home Edition” /noexecute=optin /fastdetect
multi(0)disk(0)rdisk(1)partition(1)WINDOWS=”USB Repair NOT to Start Microsoft Windows XP Home Edition” /noexecute=optin /fastdetect
Delete the following line:
multi(0)disk(0)rdisk(1)partition(1)WINDOWS=”USB Repair NOT to Start Microsoft Windows XP Home Edition” /noexecute=optin /fastdetect
DO NOT delete the wrong line!
Your computer may not boot the next time!
Save changes to the file.
At next startup the boot menu will not be displayed.
If you want to keep the repair option, you can reduce the time to display the operating system options from 30 to 5 seconds:
[Boot Loader]
timeout=5
Save changes to the file.
At next startup the boot menu will be displayed only 5 seconds.


